Chapter 12: OpenGL Rectangle
In this lecture we will modify the base code for Lab 3 to draw an animated, colored rectangle.
You can find the source code for this lab here.
1: Rectangle
First, let’s replace the triangle with a rectangle.
We’ll find the g_vertex_buffer_data variable and add a second triangle to it.
static const GLfloat g_vertex_buffer_data[] =
{
	-0.9f, -0.9f, 0.0f,
	 0.9f, -0.9f, 0.0f,
	 0.9f,  0.9f, 0.0f,

	-0.9f, -0.9f, 0.0f,
	 0.9f,  0.9f, 0.0f,
	-0.9f,  0.9f, 0.0f,
};
We’ll also need to update the number of vertices we draw, from 3 to 6.
glDrawArrays(GL_TRIANGLES, 0, 6);
While we’re at it, let’s change the background color to something a little more subtle.
glClearColor(0.7f, 0.7f, 0.7f, 1.0f);
2. Index Buffer
Let’s add an index buffer so that we can send only four vertices to render our quad (without the two duplicated vertices we currently have).
In addition to our GLuint VertexBufferID; declaration, let’s add a new handle for our index buffer:
GLuint IndexBufferID;
Now change the contents of the vertex data to only contain the four vertices we need:
static const GLfloat g_vertex_buffer_data[] =
{
	-0.9f, -0.9f, 0.0f,
	 0.9f, -0.9f, 0.0f,
	 0.9f,  0.9f, 0.0f,
	-0.9f,  0.9f, 0.0f,
};
We need to create our index buffer object (IBO) and upload the data.
Do this at the end of the initGeom() function, but
make sure it’s before the call that unbinds the VAO, glBindVertexArray(0).
// Create and bind IBO
glGenBuffers(1, &IndexBufferID);
glBindBuffer(GL_ELEMENT_ARRAY_BUFFER, IndexBufferID);

static const GLuint g_index_buffer_data[] =
{
	0, 1, 2,
	0, 2, 3
};
glBufferData(GL_ELEMENT_ARRAY_BUFFER, sizeof(g_index_buffer_data), g_index_buffer_data, GL_DYNAMIC_DRAW);
Note that the index data references one triangle on vertices 0, 1, and 2,
and one triangle on vertices 0, 2, and 3.
We also need to modify the draw call to use the index buffer. Find the glDrawArrays(...) call and replace it with:
glDrawElements(GL_TRIANGLES, 6, GL_UNSIGNED_INT, nullptr);
The number 6 refers to the 6 elements in our index buffer.
3. Add Some Color
Now that the setup work is done, let’s add some more interesting colors.
In the fragment shader we have access to a built-in variable called gl_FragCoord.
But this variable gives us the location of the current pixel in pixel coordinates.
In order to use this we need to know the dimensions of the window in our fragment shader. To pass information of this nature to our shader, we use a variable called a uniform.
A uniform is so called because it is a variable that has the same value for all vertices and all fragments within a single render command.
First, go to the init(...) function and add a new line to add a uniform:
prog->addUniform("uWindowSize");
Next, go to the render(...) function and find the glUniform______ calls.
Add a new one to upload the window size (width and height):
glUniform2f(prog->getUniform("uWindowSize"), (float) width, (float) height);
Now we have access to a uniform variable called uWindowSize in our shaders.
We’re going to use it in the fragment shader.
Open up simple_frag33.glsl and add this line before void main():
uniform vec2 uWindowSize;
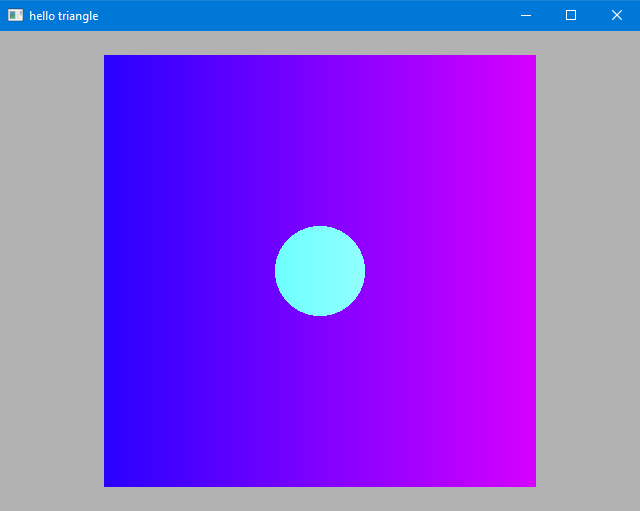
Now we can use the window size to color the quad based on horizontal position:
color.r = gl_FragCoord.x / uWindowSize.x;
This will make a gradient that goes from blue on the left to magenta on the right.
We can also add some logic to color all pixels within 45 pixels of the center of the screen:
vec2 center = uWindowSize / 2.0;
if (length(gl_FragCoord.xy - center) < 45.0)
{
	color.g = 1.0;
}
The full shader should now look like this:
#version 330 core

uniform vec2 uWindowSize;
out vec3 color;

void main()
{
	color = vec3(0.0, 0.0, 1.0);

	color.r = gl_FragCoord.x / uWindowSize.x;

	vec2 center = uWindowSize / 2.0;
	if (length(gl_FragCoord.xy - center) < 45.0)
	{
		color.g = 1.0;
	}
}
And the result should look like this:
4. Animation
Now lets add some motion to our rectangle. Since motion occurs over time, we need to make the current time available to our shaders.
First, let’s make another uniform to hold the current time.
prog->addUniform("uTime");
glUniform1f(prog->getUniform("uTime"), glfwGetTime());
glfwGetTime gives us the time since the program has started, in seconds.
Next we will use this variable in our vertex shader:
uniform float uTime;
And change the position of our vertices based on the current time:
const float radius = 0.1;

vec3 position = vertPos;
position.x = position.x + radius * cos(uTime);
position.y = position.y + radius * sin(uTime);

gl_Position = P * MV * vec4(position, 1.0);
The full vertex shader should look like this:
#version 330 core

layout(location = 0) in vec3 vertPos;

uniform mat4 P;
uniform mat4 MV;
uniform float uTime;

void main()
{
	const float radius = 0.1;

	vec3 position = vertPos;
	position.x = position.x + radius * cos(uTime);
	position.y = position.y + radius * sin(uTime);

	gl_Position = P * MV * vec4(position, 1.0);
}
And if we fire up the application, the rectangle should now be moving around in a circular motion.
This example uses the parametric equation of a circle which looks like this:
Here we are using the current time as , so the resulting animation follows a circular path.
5. Better Animation
The vertex shader lets us operate on each vertex individually, but when all the vertices move in the same way it just looks like the whole rectangle is moving.
That’s boring.
Let’s make it so that two of the vertices move in the opposite direction of the other two.
We’ll do this by sending some additional vertex data.
We could add another VBO, or add a fourth element to our vec3 position, but right now we’re not really using the
z value, so let’s just hide some information there.
static const GLfloat g_vertex_buffer_data[] =
{
	-0.9f, -0.9f,  1.0f,
	 0.9f, -0.9f, -1.0f,
	 0.9f,  0.9f,  1.0f,
	-0.9f,  0.9f, -1.0f,
};
Now in the vertex shader, let’s modify two lines:
position.x = position.x + radius * cos(uTime) * vertPos.z;
position.y = position.y + radius * sin(uTime) * vertPos.z;
Now if we open up the application, the rectangle should be doing more of a warping/distorting animation than simply moving in a circle.